A strong Microsoft Word template is more than a document with a logo. It defines layout, fonts, colors, styles, required information, placeholders, and recurring content. This allows teams to create business letters, proposals, contracts, and reports that look professional and are easy for employees to use.
In this article, you will learn step by step how to create a professional Word template, which Microsoft Word features are important, and what companies should consider when managing their templates.
What is the difference between .docx, .dotx, and .dotm?
Before creating a template, selecting the correct file format is important:
- .docx is used for standard Word documents
- .dotx is used for Word templates without macros
- .dotm is used for Word templates that include macros
For most professional Word templates, .dotx is the correct format. You only need .dotm if the template contains macros.
.webp?width=900&height=500&name=empower-word_Mockup_Devices%20(1).webp)
What should a professional Word template include?
A professional Word template should not only look good but also make the document easier to use later. This requires a clear separation between fixed elements and variable content.
Fixed elements include items such as the logo, page margins, footer, required information, or core formatting. Variable elements include information such as recipient name, date, project name, contact person, subject line, or editable text areas.
A good Word template ideally includes:
| Component | Purpose |
| Page layout | defines formatting, magins, alignment, and document stucture |
| Header and footer | contains logo, page numbers, contact details, or mandatory information |
| Corporate design | ensure brand-consistent fonts, colors, and design |
| Formatting templates | control headings, body text, lists, and tabels |
| Placeholders | indicate which content still needs to be added |
| Content controls | enable structured input |
| Text modules | provide recurring text formulations |
| Document protection | protects fixed sections form unintended changes |
| Central management | ensures that everyone works with up-to-date templates |
Creating a Word template step by step
The following instructions refer to the desktop version of Microsoft Word for Microsoft 365 or Word for Windows. Some features may differ or be unavailable in Word for the web.
Step 1: Open a new document and define the purpose of the template
Start by opening a new Word document.
Follow these steps.
- Open Microsoft Word.
- Click File.
- Select New.
- Click Blank Document.
Before you begin designing the template, determine which type of document it will support. A proposal template requires different elements than meeting minutes, a business letter, or a contract.
Clarify the following questions in advance:
- Who will use the template?
- What purpose will it serve?
- Which elements always remain the same?
- Which information must be filled in later?
- Which required information must not be changed?
- Whether there are legal, language, or brand requirements?
It is better to create separate templates for important document types instead of one universal template. This simplifies use and reduces errors.
Step 2: Set up the page layout
The page layout forms the foundation of the template. It determines how much space content has, where logos and required information appear, and how professional the final document looks.
To configure the page layout:
-
- Click Layout in the ribbon.
- Click Size.
- Choose A4 or another format.
- Click Orientation.
- Select Portrait or Landscape.
- Click Margins.
- Choose a preset or select Custom Margins.
- Define margins for top, bottom, left, and right.
- Click OK.

If the template requires different sections such as a cover page, first letter page, and following pages, use section breaks.
To insert a section break:
- Place the cursor where the new section should begin.
- Click Layout.
- Select Breaks.
- Choose Next Page under Section Breaks.
Section breaks allow different headers, footers, page numbers, or layouts on specific pages.
Important: Avoid using multiple spaces or empty paragraphs to create spacing. Instead, use margins, paragraph spacing, tab stops, and styles.
Step 3: Create the header and footer
Headers and footers contain information that appears on one or more pages. This can include the logo, company name, contact information, page numbers, legal disclosures, or confidentiality notices.
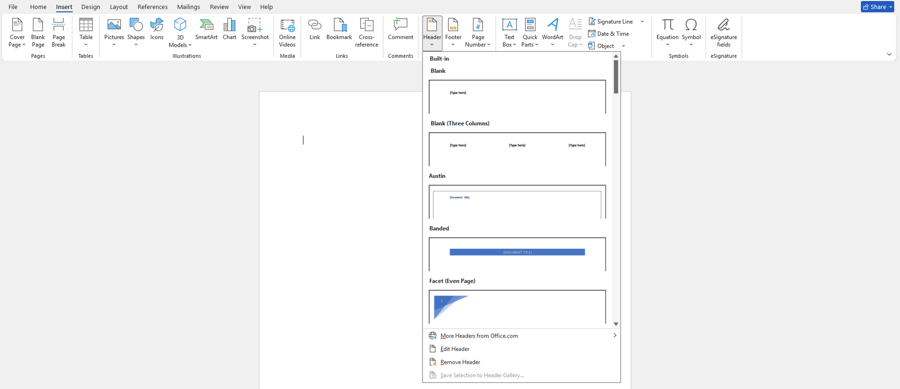
To insert a header:
- Click Insert.
- Select Header.
- Click Edit Header or choose a simple template.
- Insert your logo using Insert then Pictures if needed.
- Position the logo where required.
- Click Close Header and Footer when finished.
To insert a footer:
- Click Insert.
- Select Footer.
- Click Edit Footer.
- Add information such as address, contact details, executive management, company registration, tax ID, or page numbers.
- Close the header and footer editing mode.
To add page numbers:
- Click Insert.
- Select Page Number.
- Choose whether it appears at the top, bottom, or margins.
- Select a format.
If the first page should differ from following pages, open the header or footer and enable Different First Page.
Step 4: Set Up corporate design
Next, establish the visual foundation. This includes fonts, colors, logo placement, lines, table styles, and highlights.
Use centralized settings and styles whenever possible. Avoid manual formatting because it becomes difficult to maintain later.
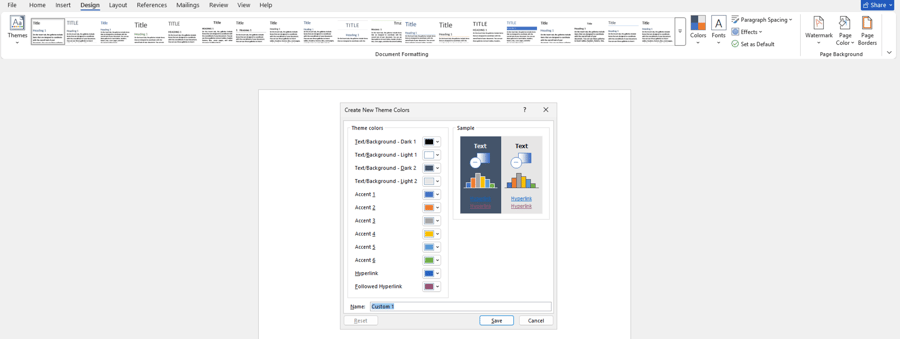
To customize theme colors:
- Click Design.
- Select Colors.
- Click Customize Colors if you use company colors.
- Define accent colors.
- Save the color scheme with a clear name.
To customize theme fonts:
- Click Design.
- Select Fonts.
- Click Customize Fonts.
- Define fonts for headings and body text.
- Save the font set.
Ensure that global Word defaults are not accidentally changed for all documents. These settings should be maintained specifically within the template.
Step 5: Define styles
Styles form the foundation of a professional Word template. They control how headings, body text, lists, quotes, tables, or captions appear.
The advantage is simple. If you later change a style, all text using that style updates automatically. This saves time and ensures consistent formatting.
To modify an existing style:
- Write example text such as a heading.
- Select the text.
- Format it as desired.
- Click Home.
- Locate the style such as Heading 1.
- Right click Heading 1.
- Select Update Heading 1 to Match Selection.

To modify a style directly:
- Click Home.
- Right click the desired style.
- Select Modify.
- Adjust font, size, color, alignment, and spacing.
- Click Format in the lower left to adjust paragraph settings, tabs, borders, or numbering.
- Confirm with OK.
In this article, we’ll show you how to apply your corporate design to Office files while ensuring that the desired design settings are automatically applied when you launch an Office application.
Step 6: Insert placeholders and content controls
A template should clearly show where information must be added. Simple placeholders might appear as.
- [Insert recipient name]
- [Insert date]
- [Insert project name]
- [Add short description]
A more professional option is content controls. These create structured input fields such as text boxes, date selectors, dropdown lists, checkboxes, or image placeholders.
First enable the Developer tab.
To enable developer tools:
- Click File.
- Select Options.
- Click Customize Ribbon.
- Check Developer on the right side.
- Click OK.
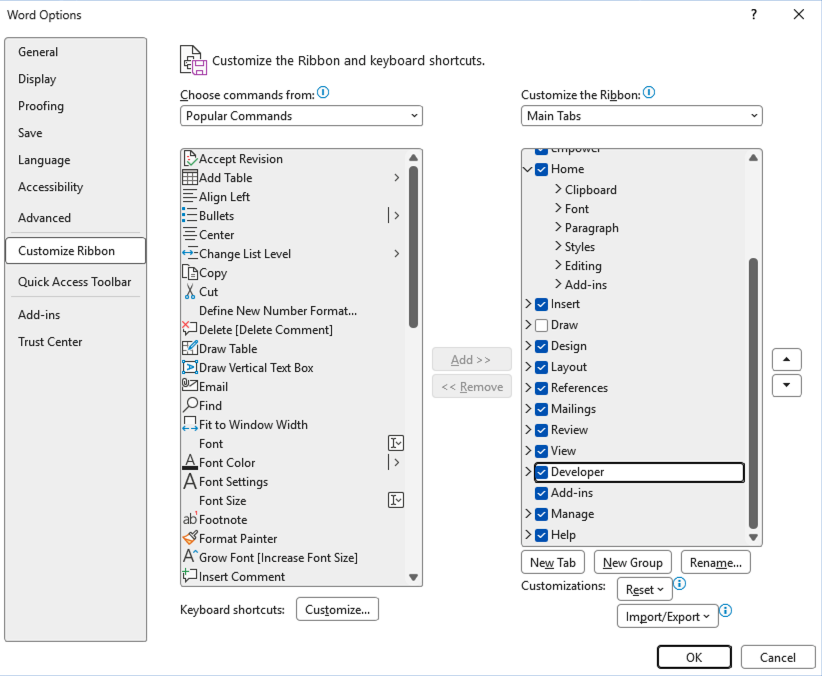
The Developer tab will now appear in the ribbon.
To insert a text content control:
- Place the cursor where the field should appear.
- Click Developer.
- Select Plain Text Content Control or Rich Text Content Control.
- Click Properties.
- Assign a title such as Project Name or Recipient Address.
- Click OK.
- Enter a hint text such as Enter project name.
Use content controls where users should enter information without affecting the document layout.
Step 7: Add dropdown lists, date fields, and checkboxes
When certain information should be standardized, selection fields are better than free text entries. This applies to items such as document type, location, language, confidentiality level, or approval status.
To insert a date field:
- Place the cursor at the desired position.
- Click Developer.
- Select Date Picker.
- Click Properties.
- Define the date format.
- Click OK.
To insert a dropdown list:
- Click the desired position.
- Click Developer.
- Select Dropdown List Content Control.
- Click Properties.
- Click Add to enter options.
- Enter the required selections.
- Click OK.
To insert a checkbox:
- Click the desired position.
- Click Developer.
- Select Check Box Content Control.
- Adjust settings in Properties if needed.
Use dropdown lists when users must choose from fixed options. Use a combo box if users may also enter their own text.
Step 8: Prepare reusable text blocks
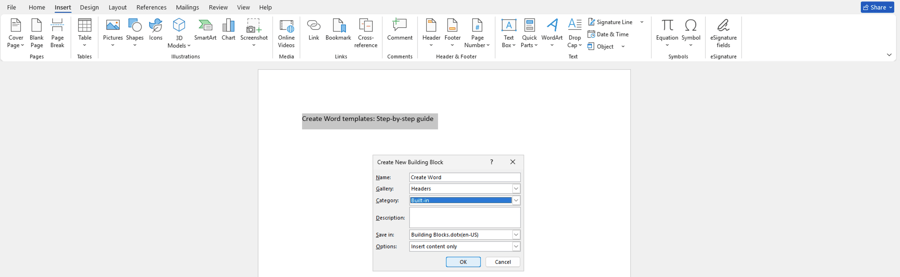
Many documents include recurring wording such as introductions, legal notices, service descriptions, disclaimers, privacy text, or standard phrases. Word allows you to save these as Quick Parts.
To save text as a Quick Part:
- Select the text you want to reuse.
- Click Insert.
- Select Quick Parts.
- Click Save Selection to Quick Part Gallery.
- Enter a name.
- Choose the catalog and category.
- Click OK.
To insert a Quick Part later:
- Click the location where it should appear.
- Click Insert.
- Select Quick Parts.
- Choose the saved entry.
Step 9: Prepare tables, lists, and a table of contents
Professional templates should include common structural elements such as tables, lists, captions, and automatic tables of contents.
To insert a table:
- Click Insert.
- Select Table.
- Define rows and columns.
- Format the table under Table Design.
- Apply colors, borders, and header rows according to corporate design.

To create lists:
- Select the text.
- Click Home.
- Choose Bullets or Numbering.
- Adjust indents and spacing in paragraph settings.
To insert an automatic table of contents:
- Use Heading 1, Heading 2, and Heading 3 styles consistently.
- Place the cursor where the table of contents should appear.
- Click References.
- Select Table of Contents.
- Choose an automatic style.
An automatic table of contents works correctly only if headings use proper styles.
Step 10: Restrict editing and protect fixed areas
Certain areas should not be edited, such as logos, required information, legal notices, approved wording, or layout sections. Editing restrictions can protect these areas.
To prepare protected sections:
- Click where a new section should begin.
- Click Layout.
- Select Breaks.
- Insert a section break if needed.
.png?width=900&height=274&name=Schritt%2010%20Englisch%20(2).png)
To restrict editing:
- Click Review.
- Select Protect.
- Click Restrict Editing.
- Enable Allow Only This Type of Editing in the Document.
- Choose options such as Filling in Forms or No Changes.
- Specify which sections remain editable.
- Click Yes Start Enforcing Protection.
- Set a password if required.
Step 11: Test the template
Before releasing the template, test it using realistic content. Be sure to include not only short sample texts, but also longer paragraphs, tables, lists, and pages with different page numbers.
Check the following:
- All placeholders and required fields are correct?
- Headers, footers, margins, and spacing remain stable?
- Styles, tables, lists, and table of contents work properly?
- Only intended sections are editable?
- PDF export works correctly?
- Less experienced Word users can understand the template?
Step 12: Save the template as .dotx or .dotm
Once the template has been created and tested, save it as a Word template.
To save the file:
- Click File.
- Select Save As.
- Click Browse.
- Choose Word Template (.dotx) as the file type.
- Enter a clear file name.
- Click Save.
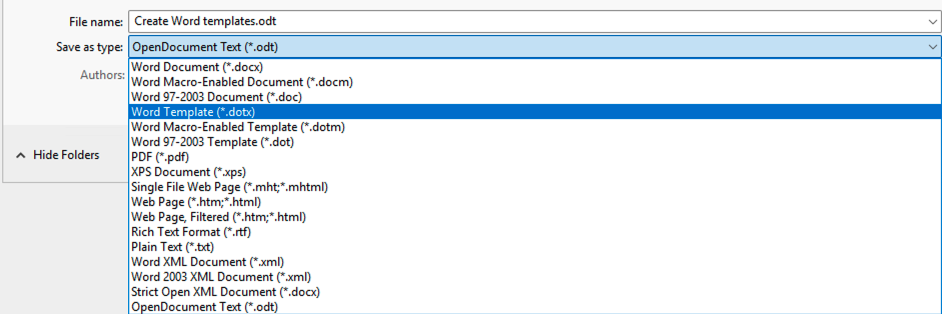
If macros are included, select Word Macro Enabled Template (.dotm).
To display the template under File → New → Personal, save it in the Custom Office Templates folder.

Step 13: Provide and maintain the template
For individuals, saving a template locally may be sufficient. In companies, this approach is rarely adequate. Templates should be centrally managed and maintained.
Clarify the following questions:
- Where the template will be stored?
- Who can edit it?
- Who reviews new versions?
- How outdated templates are removed?
- How employees learn about updates?
- How different languages, brands, or locations are handled?
Managing templates becomes more complex when many teams and locations are involved. Clear responsibilities and centralized management are essential.
Managing Word templates in organizations
In many companies, creating a template once and storing it in a folder is not enough. Over time, multiple versions appear such as outdated letter templates, copied proposals, local modifications, or files with obsolete legal information.
This leads to common problems:
- Employees cannot find the correct template
- Outdated versions continue to be used
- Logos, colors, or fonts are no longer current
- Legal information becomes inaccurate
- Documents look inconsistent across departments
- Marketing, communications, legal, and IT must coordinate changes manually

Template management should therefore be treated as a central process. Templates, text blocks, images, and required information should be maintained in one location and made directly available within Word.
This ensures that employees always work with approved, up to date, brand compliant content.
With empower® Template Management, organizations can centrally manage Office templates, text blocks, and content and make them directly available in Microsoft Word. Employees can then create professional documents that align with the company brand. Dynamic templates can go even further by automatically populating documents based on user input.
Checklist for creating a professional Word template
Review your template using this checklist:
☐ Document type and purpose are clearly defined
☐ Page layout is configured
☐ Header and footer are created
☐ Corporate design is integrated
☐ Styles are defined
☐ Placeholders and content controls are inserted
☐ Dropdown lists, date fields, or checkboxes are configured
☐ Reusable text blocks are prepared
☐ Tables, lists, and table of contents work properly
☐ Fixed areas are protected
☐ The template has been tested with realistic content
☐ The file is saved as .dotx or .dotm
☐ Storage location and versioning are defined
☐ Responsibilities for updates are assigned
Conclusion
A well designed Word template helps employees create documents faster, more consistently, and with higher quality. It reduces manual work, prevents formatting errors, and ensures that important guidelines are followed.
In organizations, Word templates are also an important part of brand management. Every proposal, business letter, contract, and report shapes the impression that customers, partners, and applicants form of a company.
The more people work with Word, the more important centralized management becomes. Only this approach ensures that templates, text blocks, required information, and corporate design elements remain accurate and consistent over time.
Interested in a template management solution for Word? Contact us. Our experts would be glad to help.


Template management systems: brand consistency made easy

Corporate design in Office - using themes and template files