Master fields allow you to label, select, or classify presentations. For example, you want a presentation to be used internally only. Therefore each slide of this presentation should be classified by “internal use only". You can do this by using master fields. These are defined in the form of text fields or shapes in the master.
How to create master fields in PowerPoint
To set up a master field, you must first switch to the “Slide master" view via the “View" tab in the PowerPoint bar.
If you want the marker to appear on all slides of the presentation, insert a text field on the first, large layout in the master (master layout), which you define as the master field.
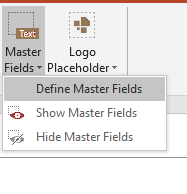
Drag the field to the desired position and format it as desired (e. g. font, color, size). Then mark the field and click on “Define master field" in the PowerPoint bar under the heading “Slide master", top right.
3 basic types of the master fields in PowerPoint
- “Master field for text":
You can freely enter a text into the master field later. Example: You want to insert a footer with reference name and date, the field is filled by the user himself.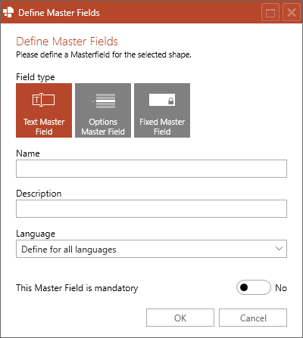
- “Master field for options":
You can specify a selection of texts which the user can later select from a drop-down list. Example: You want to create a classification, the user should be able to choose how the presentation is to be classified for each presentation (internal, strictly confidential).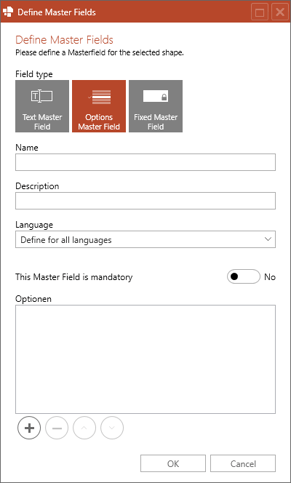
- Fixed Master Field:
Here there is only the option to insert or remove the master field from the presentation via a checkbox in the presentation settings. This option is suitable if the master field is to be inserted only optionally or only a fixed text is to be used. Example: Via a rigid text field, the user can choose whether a fixed text is inserted or not.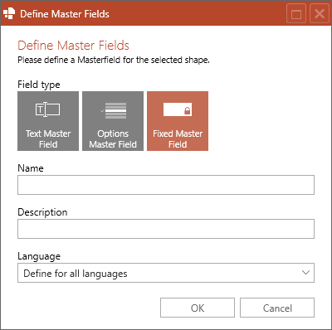
Name the master field
Under “Name", you should give the field a name that will later be displayed in the “Presentation Settings" menu.
Create a description for the master field
You can also enter a description for the master field, which also appears in the “Presentation settings"; menu under the name of the field.
Assign a language to the master field
The master field can also be assigned to a language, “Define for all languages" is selected by default. In this case, the master field appears regardless of which language is set for the current presentation. If the master field is assigned to a certain language, it is only available in the presentation if this language is also set in the corresponding language.
Final settings for the master field
In this way you can create a master field several times and make the name and, if necessary, the description available in the corresponding translation for each language.
If you select the option “This field is a mandatory field", the “Presentation Settings"; open automatically when a presentation is opened with this master.
After you have defined the master field, you should hide it via “Hide master fields" and save the changes in the master in the library.
Via “Show master fields" you can display the field again at any time for further editing.
If you now open a presentation with this master, you can edit the master field for the current presentation in the “Presentation Settings".
empower® can help you manage your slide masters and ensure that your current slide design is used in all PowerPoint presentations. Learn more about empower® Slides.


empower®: The PowerPoint add-in for macOS

A new take on PowerPoint presentations